Set up the Dashboard | Dashboard widgets
The Dashboard offers a comprehensive overview of your day, presenting concise and pertinent information. You can take action on various items, including appointments, tasks, and messages, all directly from the Dashboard.
The page automatically refreshes every three minutes. Select the refresh icon![]() to manually refresh.
to manually refresh.

Set up the Dashboard
Set the Dashboard as the default landing page
If you set the Dashboard as the default landing page in Account Settings, it's also set in Dashboard Settings.
- Select Account > Account Settings > General tab.
- Under Calendar Settings, select the Use new dashboard homescreen checkbox.
- Select Update Entire Profile.

Dashboard settings
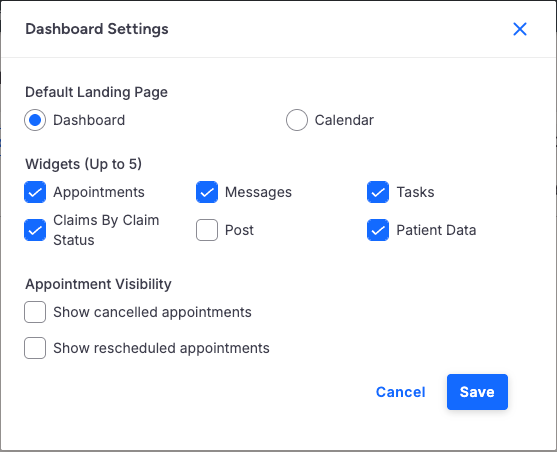
Customize the information shown on the Dashboard and choose your default landing page from the Dashboard Settings window.
- If the Dashboard isn't your default landing page, select Schedule > Dashboard.
- Select the gear icon
 on the top right.
The Dashboard Settings window opens.
- Make your selections and then select Save.

- Default Landing Page: Select Dashboard or Calendar as your default landing page.
- Widgets: Select the corresponding checkbox to have the widgets show on the Dashboard.
- Appointment Visibility: Select whether to show canceled and/or rescheduled appointments. The Appointments widget is required for this option to appear in Dashboard Settings.
Dashboard widgets
Appointments widget
The Appointments widget provides a detailed view of your appointments for the day. You can manage appointments directly from the Dashboard.
- Select the Provider or Office tab to switch views
- Filter the appointments by a specific provider, office, or date.
- The widget automatically scrolls to the day's next appointment. Scroll up or down to see previous or future appointments.
| Label/Icon/Checkbox | Description/Field on Appointment Page |
|---|---|
| Hide Past Appointments | Select the checkbox to hide past appointments. |
| Edit the appointment. The icon appears when you select an appointment box. | |
| Appointment time and duration | Scheduled time and duration |
| Office location | Office |
| Appointment profile | Profile |
| Patient's name | Select the link to open the patient's chart. |
| Vitals Not Taken/Vitals Taken | Select the Vitals Not Taken/Vitals Taken link to open the Appointment page. Vitals Not Taken: This status shows when the patient's vitals haven't been taken by medical staff or when you select Mark as Undone on the Vitals page. The lock icon  Vitals Taken: This status shows when you select Mark as Done on the Vitals page.  |
| Exam room | Exam |
| Appointment status | Located below the patient's name. Use the dropdown to change the status. Status on Appointment page. |
| Note Not Locked/Note Locked | Select the Note Not Locked/Note Locked link to open the clinical note. Note Not Locked: This status shows when the clinical note hasn't been locked. Note Locked: This status shows when the clinical note has been locked. |
| Insurance and eligibility status | If an appointment has multiple eligibility coverage, you can hover over a tooltip to view additional eligibility coverages and the date it was checked. |
| Reason for visit | Reason |
| Border color | Border color on the left side is derived from the color selected for the appointment profile (Schedule > Appointment Profiles). |

Messages widget
The Messages widget shows all of your incoming messages.
- Filter by patient name or by message type.
- Filter message status by selecting All, Unread, or Read from the dropdown.
- A blue dot indicates an unread message.
A message box shows the following:
- Message title
- Message type
- Patient's name - Select the link to open the patient's chart.
- Message date
- Select the pencil icon
 to open the Message Center. The icon appears when you select a message.

Tasks widget
The Tasks widget is a dynamic view of your outstanding tasks, which can be updated and completed directly from the Dashboard.
- Select Task to create a task
- Filter by patient or category
- Update the status using the dropdown
- Overdue tasks are at the top of the list in red
A task box shows the following:
- Due date
- Priority level
- Patient's name - Select the link to open the patient's chart.
- Category
- Task title
- Status - Use the dropdown to update the status

Claims by Claim Status widget
The Claims by Claim Status widget provides a snapshot view of the practice's claims, categorized by statuses that launch users to the Live Claims Feed.
- Select Go to Billing to open the Live Claims Feed page. All claims statuses are shown.
- The widget is divided into two columns — Claims in Progress and Claims to Review.
- The total number of claims appears next to each column header and claim status.
- Select a column heading or claim status link to view their details on the Live Claims Feed page.

Patient Data widget
The Patient Data widget shows the practice's total outstanding patient balance, the number of active payment plans, and the number of late payment plans.
Post widget
The Post widget shows the practice's unmatched ERAs, unallocated payments, and patient payments for 30, 60, 90, or 120 days.
