To assist your office in easily identifying top denials, identifying the root cause, and developing a plan to eliminate them, DrChrono has added the ability to create custom adjustment codes.
Once custom adjustment codes have been set up for your office, they are ready to be used.
- Navigate to Billing > Live Claims Feed
- Locate the patient appointment via the patient name, drc claim #, or date of service.
- Enter the appointment by selecting the date of service.
- To adjust a billed code using a custom adjustment code, press the + symbol on the right of the row.

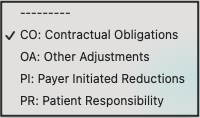
- Under the adjustment reason arrow, you will find the custom adjustment codes at the very bottom of the listing.


- Once the custom adjustment reason is selected, enter the amount in the Adjmt box. The amount should be listed as a positive number and not use a minus (-) sign.

- Select the applicable adjustment reason in the last box on the row. Choices include:

- Once entered, press Verify & Save. The amount you have entered will automatically adjust from the claim.


