Clinical Form Management offers an improved workflow for creating and managing custom clinical templates. It includes enhanced features that streamline the form-building process. Both the updated and original form builders remain available and operate in parallel to support your preferred workflow.
Clinical Form Management is currently only supported on Google Chrome.
| Manage forms | Create a new form |
| Understanding Field Settings | Best practices |
| Archive form | Share form |
Finding and Managing Your Forms

View Your Forms
- Go to Clinical > Form Tools > Clinical Form Management
- Your forms appear in alphabetical order by default
Search for Forms
- By name: Type in the search box to filter forms
- By tags: Use the tag search feature
- Sort options: Click the arrows next to column headers to sort A-Z or by last edited date
Quick Actions
Click the icons in the Action column to:

- Make Form Persistent — Keeps the form continuously visible and available within a note or record, rather than collapsing or disappearing after submission.
- Hide Form Name Header — Removes the form's title/name from displaying at the top of the form when viewed by users.
- Set as Default Form — Designates this form as the one that automatically loads first when creating a new entry in this category or context.
- Exclude from Complete Note — Prevents this form's fields and data from being included when a full/compiled note is generated or exported.
- Share — Provides options to share the form with other users or external parties, with a submenu for sharing method selection.
- Duplicate Form — Creates an exact copy of the form, allowing you to use it as a template or make variations without rebuilding from scratch.
- Set as Workflow Form — Assigns the form to a specific workflow, enabling it to trigger or participate in automated sequences or multi-step processes.
Only one form can be set as the default at a time.
Editing Forms with USCDI v3 Fields
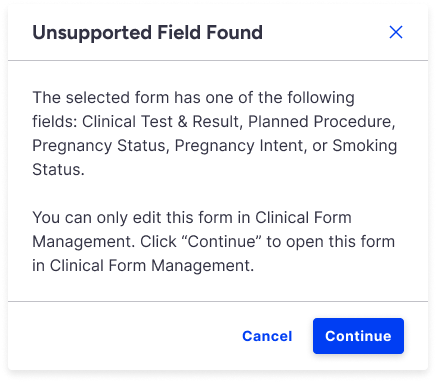
When opening forms that contain USCDI v3 fields in the Legacy Form Builder, you will see a pop-up message instead of an error.
This message will appear if the form includes any of the following fields:
- Clinical Test & Result
- Planned Procedure
- Pregnancy Status
- Pregnancy Intent
- Smoking Status
You will have two options:
Continue — You will be redirected to the Clinical Form Management screen, where the selected form will automatically open and be ready for editing.
Cancel — The pop-up will close and you will remain on the Legacy Form Builder screen. The form will not open, but you can select another form to edit.
Forms containing any USCDI v3 fields cannot be opened or edited in the Legacy Form Builder.
Create a New Form
Your changes save automatically as you work.
Get Started
- Go to Clinical > Clinical Form Management
- Click New Form
- A blank form appears in the center of your screen
Name Your Form
- Click Options > Edit Form Info
- Type a name for your form
- Click Update
Add Form Fields
- Open the Form Elements tab on the side
- Drag the field type you want into the "Add Here" sections on your form
- To add a row between existing fields, hover between them and click the + icon
Edit or Remove Fields
Hover over any field to see quick options:
- Edit the field settings
- Copy the field
- Delete the field
Preview Form
Users can preview forms while building or editing them, eliminating the need to exit the application and access an existing appointment.

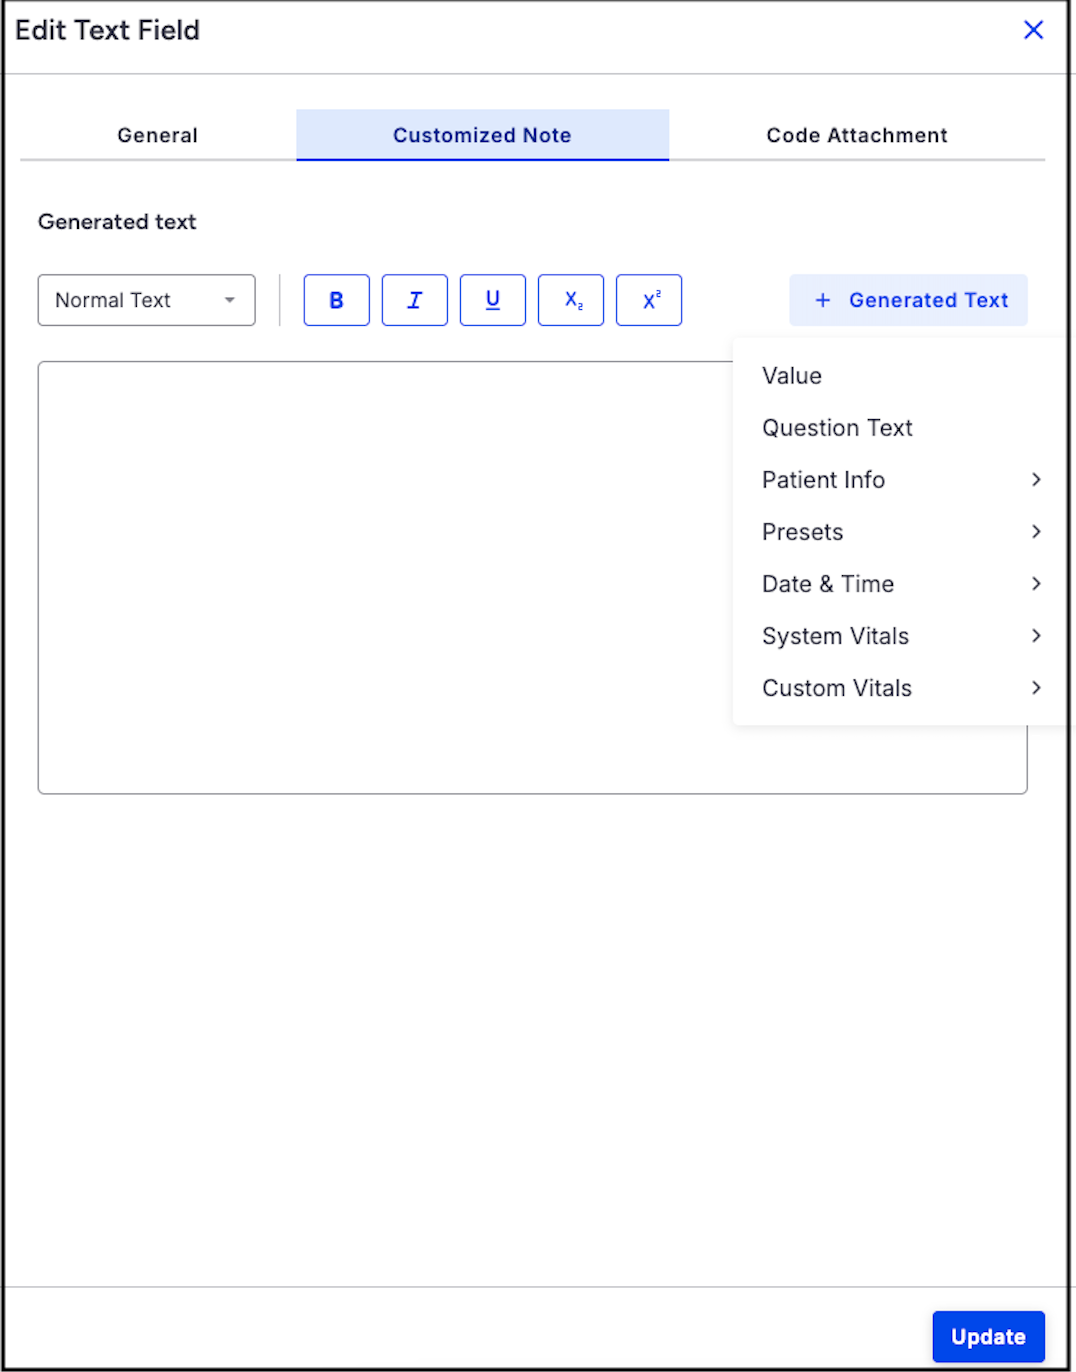
Understanding Field Settings
Editing Field Properties
Each form field includes three tabs:
General
- Set the field label, spacing, width, and field requirements.
Customized Note
- Create generated text using variables (e.g., value).
- Generated text appears in the clinical note and can be routed to the correct section of the clinical note PDF.
Billing Code Attachment
- Attach a single billing profile, if needed.
Editing a Form

Make Form Persistent, Hide Form Name Header, Set as Default Form, Exclude from Complete Note, Duplicate Form, Set as Workflow Form, and Share — are the same as described in this section.
Edit Form Info — Opens the form's settings to modify its name, description, or other configuration details.
Clear Form — Erases all data currently entered in the form, resetting it to a blank state without deleting the form itself. (Displayed in red to indicate it is a destructive action.)
Archive Form — Removes the form from active use and stores it for historical reference, keeping the data intact but hiding it from regular workflows. (Displayed in red to indicate it is a destructive action.)
Reset to Default — Restores the form's settings and/or field values back to their original default configuration, undoing any customizations or changes that have been made.
Form Type (Preset Only)
- Form Type determines how data is routed within a CCDA file.
- Form types are predefined by DrChrono and follow HL7 standards.
- Users cannot create custom form types.
Character Count for Single & Multi-Select Form Fields
When creating single-select or multi-select questions:
- Each answer option can have up to 950 characters
- A counter shows how many characters you've used (example: 125/950)
- If you go over 950 characters, the field turns red and you must shorten it before saving
Free Draw Images
You can control how large free draw images appear in clinical notes. Choose from:
- Extra Small
- Small
- Medium
- Large
- Extra Large
- Actual Size (original size, auto-scaled if too large)
These size options are selected in clinical form management and will apply to all images added to that specific free draw field.

Text Editor Feature
Format text in your forms to make information clearer:
Text styles:
- Normal text
- Heading (for main titles)
- Subheading (for secondary titles)
Formatting options:
- Bold – highlight important information
- Italics – emphasize medical terms
- Underline – draw attention
- Subscript – for chemical formulas (H₂O)
- Superscript – for notations (cm²)
How to format: Select your text, click the toolbar, and choose your style.
You can combine formatting options (for example, bold and underline) to make key details stand out.
SOAP Section Format
SOAP stands for Subjective, Objective, Assessment, and Plan—a standard medical note format.
For individual fields:
- Toggle between "New Section" (1 text field) or "SOAP Section" (4 text fields)
For the entire form:
- Use "Set All Sections to SOAP" to apply SOAP formatting to all fields at once
- Turning this off hides SOAP fields but keeps your data safe—turn it back on to restore them
Smart Fields
Smart fields show or hide based on another field's answer.
To set up:
- Turn on "Smart Field" toggle for the main (parent) field
- For each related (child) field, select the parent field from the dropdown
- Child fields only appear when the parent field is filled in
Best Practices
To ensure optimal performance and usability of Clinical Notes, follow these recommended best practices when building custom forms.
Managing Form Size
- Keep forms at 55 fields or fewer for optimal performance
- Forms with more fields may experience slower loading times and reduced responsiveness
- Consider breaking large forms into multiple smaller forms
- Remove any unused or duplicate fields to improve performance
- Legacy Form Alerts: Existing forms that exceed the recommended limit display warnings indicating they may not load as expected.
Use Smart Fields Strategically
- Smart fields allow for conditional display of child fields based on the parent field’s value.
- To set up:
- Turn on the Smart Field toggle for the parent field.
- For each child field, choose the parent field name from the Parent Field dropdown.
- To set up:
- In the Clinical Note screen:
- When the parent field is enabled, the child fields will be displayed automatically.


Set Forms to Be Persistent Only for Person-Level Data
Use persistent forms only for static, person-level data that should carry forward across visits.
Examples: Family history, social history (e.g., “Father has Type 2 Diabetes”)
- Persistent forms automatically pull data from the most recently locked note into future appointments.
- ✅ Use for: Unchanging patient information (family history, social history)
- ❌ Don't use for: Visit-specific information
To reuse visit-specific data: Use "Copy Previous Note" instead and select which forms and dates you want.

Wait for Auto-Save

A save notification appears when you make changes. Wait until it disappears before:
- Switching to another DrChrono tab (Calendar, Form Builder, etc.)
- Opening another form in the same appointment
Moving too quickly can cause data loss.
For example, if you turn a toggle switch on with billing codes linked and toggle to the billing section within the clinical note before the autosave notification has disappeared, the linked billing codes may not appear in the billing section as expected until the save process has been completed.
Billing Codes Best Practice
When adding billing information to a field, choose one of these options:
- Billing profiles (allows modifiers)
- Individual clinical codes (no modifiers)
Don't use both on the same field—this can cause billing errors.

Archiving Form
Learn more about steps to Archive and Restore a Form.
Archive a Form
- Go to Clinical > Clinical Form Management
- Click the archive icon next to the form
- If the form is used in any unlocked notes, you'll see a notification
View Archived Forms
- Go to Clinical > Archive (beta)
- Search for archived forms
- You can unarchive forms if needed
Viewing and Managing Archived Forms
- Access Archived Forms
- Go to Clinical > Archive (beta) to view archived forms.
- Search for Associated Unlocked Clinical Notes
- Locate the archived form in the list.
- Use available options to:
- Search for any unlocked notes still associated with the form.
- Or Unarchive the form if needed for further use.
You cannot fully archive a form that's still being used in unlocked clinical notes..
Sharing Forms
Share a Form
- Go to Clinical > Clinical Form Management
- Click the three-dot menu (...) next to the form
- Click Share
Choose How to Share
- Upload to Library – Makes the form available to others in the shared Form Library
- Send as Email – Email the form as an attachment
